【译】Google 出品 - 利用 webpack 做 web 性能优化
原文 https://developers.google.com/web/fundamentals/performance/webpack/
PS. 在 20180211 笔者翻译过一次,当时也没有完全理解和使用文中提到的优化项,近期工作中因为用到 Webpack 4.x 对生产环境进行打包,加深了一些理解,本译文对原有译文补充的 Webpack 4 内容,同时对原译文进行了校对和一些细节措辞的修改。
目录
- Instroduction 介绍
- Decrease Front-end Size 减少前端体积
- Enable minification 开启最小化
- Specify NODE_ENV=production 明确生产环境信息
- Instroduction 介绍
- Decrease Front-end Size 减少前端体积
- Use the production mode (webpack 4 only) 使用生产模式(仅用于 webpack 4)
- Enable minification 开启最小化
- Specify
NODE_ENV=production明确生产环境信息 - Use ES Modules 使用 ES 模块
- Optimize images 优化图片
- Optimize dependencies 优化依赖
- Enable module concatenation for ES modules (aka scope hoisting) 为 ES modles 开启模块连接
- Use externals if you have both webpack and non-webpack code 如果代码中包含 webpack 和非 webpack 的代码要使用 externals
- Summing up 总结
- Make use of long-term caching 利用好长时缓存
- Use bundle versioning and cache headers 使用 bundle 版本和缓存头信息
- Extract dependencies and runtime into a separate file 将依赖和运行环境代码提取到一个单独的文件
- Inline webpack runtime to save an extra HTTP request 内联 webpack runtime 节省额外的 HTTP 请求
- Lazy-load code that you don’t need right now 懒加载
- Split the code into routes and pages 拆分代码到路由和页面中
- Make module ids more stable 使用稳定的 module ids
- Summing up
- Monitor and analyze the app 监控并分析
- Conclusion
Instroduction 介绍
作者 Addy Osmani
现代 Web 应用经常用到 bunding tool 来创建生产环境的打包文件(例如脚本、样式等等),打包文件是需要优化并压缩最小化,同时能够被用户更快地加载。在这篇文章中,我们将会利用 webpack 来贯穿说明如何进行高效地优化网站资源。这能帮助用户更快地加载你的应用同时获得更好的体验。

webpack 是当今最流行的打包工具之一,深入地利用它的特点去优化代码,将脚本拆分成不同的部分,同时剔除无用代码将能够保证你的应用维持最小的带宽和进程消耗。
Note: 我们创建了一个练习的应用来演示下面这些优化的描述。尽力抽更多的时间来练习这些 tips
webpack-training-project
让我们从现代 web 应用中最耗费资源之一的 Javascript 开始。
Decrease Front-end Size 减少前端体积
作者 Ivan Akulov
当你正在优化一个应用时,首要事情就是尽可能地将它体积的减小。下面我们就来看看通过 webpack 如何做到减小前端体积。
Use the production mode (webpack 4 only) 使用生产模式(仅用于 webpack 4)
Webpack 4 介绍了一种新的模式,你可以将其设置成 development 和 production 用于告诉 Webpack 你正在为不同的环境打包:
1 | // webpack.config.js |
当你正在为你的应用用于生产环境编译打包时要确定开启了 production 模式。这样就帮助 webpack 开启类似压缩最小化代码、去除依赖库中开发环境代码等其他的优化项。
Further reading 扩展阅读
Note: 笔者也翻译了另外一篇介绍新增 mode 的文章,感兴趣可以点击链接
Enable minification 开启最小化
Note: 大部分只针对 webpack 3 如果你正在使用 webpack 4 生产模式打包,bundle 级别的最小化功能已经开启 - 你只需要配置对应 loader 选项即可
最小化就是通过去除多余空格、缩短变量名等方式压缩代码。例如:
1 | // Original code |
↓
1 | // Minified code |
Webpack 支持两种方式最小化代码:bundle-level 最小化 和 loader-specific options。他们可以同时使用。
Bundle-level minification bundle 级别的最小化
Bundle-level 最小化功能可以在编译完成后压缩整个 bundle。下面来看下它是如何工作的:
1.原始代码如下:
1 | // comments.js |
2.Webpack 编译后的内容大概是下面这个样子:
1 | // bundle.js (part of) |
3.最小化之后的代码大概是下面这个样子:
1 | // minified bundle.js (part of) |
在 Webpack 4 中,bundle 级别的的最小化是自动开启的 - 同时在生产模式下、没有启用 bundle-level 都会开启。它是利用 UglifyJS 引擎来进行最小化的。(如果你需要禁用最小化,仅仅设置开发模式或者设置 optimization.minimize 为 false。)
在 Webpack 3 中,你需要直接使用 UglifyJS 插件。该插件是 webpack 提供的;开启并设置插件选项即可:
1 | // webpack.config.js |
Note: 在 webpack 3 中,UglifyJS 插件不能编译 ES2015+(ES6) 的代码,这就意味着你在代码中使用 classes, arrow function 或者其他新特性时,不能将他们编译成 ES5的代码,插件会抛错。
如果你需要编译这些新语法,就要用到 uglifyjs-webpack-plugin package,他也是在 webpack 中捆绑一起的,但是版本更新,并且可以编译 ES2015+ 的代码。
Loader-specific options 特定的 Loader 配置
最小化代码的第二步就是利用特定的 loader 配置。配置这些 loader,你可以压缩那些不能被最小化的部分。举个例子,当你使用 css-loader 引入一个 css 文件时,文件会被编译成一个字符串:
1 | /* comments.css */ |
↓
1 | // minified bundle.js (part of) |
这部分内容由于是字符串并没有被最小化。于是我们需要配置对应的 loader 选项来达到最小化的目的:
1 | // webpack.config.js |
Further reading
- The UglifyJsPlugin docs UglifyJs 插件文档
- Other popular minifiers: Babel Minify, Google Closure Compiler 其他流行的最小化工具
Specify NODE_ENV=production 明确生产环境信息
Note: 仅在 webpack 3 中生效,如果使用生产模式 webpack 4 打包,NODE_ENV=production 优化项已经开启,就可以直接跳过此小结
减小前端体积的另外一个方法就是在代码中将 NODE_ENV 环境变量设置为 production 。
Libraries 会读取 NODE_ENV 变量判断他们应该在那种模式下工作 - 开发模式 or 生成模式。很多库会基于这个变量有不同的表现。举个例子,当NODE_ENV没有设置成production,Vue.js 会做额外的检查并且输出一些警告:
1 | // vue/dist/vue.runtime.esm.js |
React 也是类似 - 开发模式下 build 带有一些警告:
1 | // react/index.js |
这些检查和警告通常在生产环境下是不必要的,但是他们仍然保留在代码中并且会增加库的体积。
在 Webpack 4 中增加 optimization.nodeEnv: 'production' 选项即可剔除掉它们:
1 | // webpack.config.js (for webpack 4) |
在 Webpack 3 中则使用 DefinePlugin :
1 | // webpack.config.js (for webpack 3) |
optimization.nodeEnv: 'production' 选项和 DefinePlugin 插件采用相同的方式来解决这个问题 - 这个方式就是他们将 process.env.NODE_ENV 替换成特定的值,下面的配置可以说明:
1.Webpack 会将所有 process.env.NODE_ENV 替换成 "production":
1 | // vue/dist/vue.runtime.esm.js |
↓
1 | // vue/dist/vue.runtime.esm.js |
2.与此同时最小化工具会移除掉所有 if 的条件分支 - 由于 "production" !== 'production' 永远会返回 false,这样分支内的代码就永远不会执行:
1 | // vue/dist/vue.runtime.esm.js |
↓
1 | // vue/dist/vue.runtime.esm.js (without minification) |
Further Reading 扩展阅读
- What “environment variables” are 解释什么是环境变量
- Webpack docs about:
DefinePlugin,EnvironmentPluginDefine 插件和 Environment 插件文档
Use ES Modules 使用 ES 模块
下面这个方式利用 ES modules 减小前端体积。
当你使用 ES module,webpack 有能力去做 tree-shaking。Tree-shaking 贯穿了整个依赖树,检查哪些依赖被使用,同时移除掉无用依赖。因此,如果你使用 ES module 方式的时候,webpack 帮你可以排除掉无用代码:
1.一个有多个 export 的文件,但是 app 只需要其中一个:
1 | // comments.js |
2.Webpack 分析 commentRestEndPoint 没有被用到,就不会在一个 bundle 中生成单独的 export:
1 | // bundle.js (part that corresponds to comments.js) |
3.最小化工具就会移除掉无用变量:
1 | // bundle.js (part that corresponds to comments.js) |
如果他们都是有 ES module 编写,就是与一些库并存时也是生效的。
Note: 在 webpack 中,tree-shaking 没有 minifier 是无法生效的。 webpack 仅仅移除了没有被用到的 export 变量;
UglifyJSPlugin才会移除无用代码。所以如果你编译打包时没有使用 minifier,打包后体积并不会更小。你也可以不一定使用这个插件。其他最小化的插件也支持移除 dead code(例如:Babel Minify plugin or Google Closure Compiler plugin)
Warning: 不要将 ES module 编译到 CommonJS 中。 如果你使用 Babel
babel-preset-envorbabel-preset-es2015,检查一下当前的配置。默认情况下, ESimportandexportto CommonJSrequireandmodule.exports。通过设置 option 来禁止掉Pass the{ modules: false }option。
Futher reading 扩展阅读
- “ES6 Modules in depth” 深入理解 ES6 Modules
- Webpack docs about tree shaking Webpack tree shaking 文档
Optimize images 优化图片
图片基本会占局页面一半以上体积。虽然它们不像 JavaScript 那么重要(比如它们不会阻止页面渲染),但图片仍然会占用掉一大部分带宽。可以利用 url-loader,svg-url-loader 和 image-webpack-loader 来进行优化。
url-loader 允许将小的静态文件打包进 app。没有配置的话,他需要通过传递文件,将它放在编译后的打包 bundle 内并返回一个这个文件的 url。然而,如果我们注明 limit 选项,它将会编码成更小的文件 base64 url 并返回这个 url。这样将图片放在 Javascript 代码中,可以节省 HTTP 的请求:
1 | // webpack.config.js |
1 | // index.js |
Note: 内联图片减少了独立请求的数量,这是很好的方式(even with HTTP/2),但是会增加 bundle下载和转换的时间和内存的消耗。一定要确保不要嵌入超大图片或者较多的图片 - 否则增加的 bundle 的时间将会掩盖做成内联图片的收益。
svg-url-loader与url-loader类似 - 都是将使用 URL encoding encode 文件。这对对于 SVG 图片很奏效 - 因为 SVG 文件是文本,encoding 在体积上更有效率:
1 | // webpack.config.js |
Note: svg-url-loader 拥有改善 IE 浏览器支持的 options,但是在其他浏览器中更糟糕。如果你需要兼容 IE 浏览器,设置 iesafe: true 选项
image-webpack-loader压缩图片使之变小。它支持 JPG,PNG,GIF 和 SVG,因为我们将会使用它所有类型。
这个 loader 不会将图片嵌入在应用内,因此它必须与url-loader和svg-url-loader配合使用。避免复制粘贴到相同的 rules 中(一个用于 JPG/PNG/GIF 图片,另一个用于 SVG 图片),我们来使用enforce: pre作为单独的一个 rule 涵盖这个 loader:
1 | // webpack.config.js |
默认 loader 设置就已经可以满足需求了 - 但如果你想要深入配置,请查看 the plugin options。为了选择哪些 options 需要明确,可以查看 Addy Osmani 的 guide on image optimization
Further reading 扩展阅读
- “What is base64 encoding used for?” Base64 编码究竟可以用在何处?
- Addy Osmani’s guide on image optimization Addy Osmani 的图片优化指南
Optimize dependencies 优化依赖
平均一半以上的 Javascript 体积大小来源于依赖包,并且这些可能都不是必要的。
举一个例子来说,Lodash(v4.17.4)增加了最小化代码的 72KB 大小到 bundle 中。但是如果你仅仅用到它的20个方法,大约 65 KB 代码没有用处。
另外一个例子就是 Moment.js。 V2.19.1版本最小化后有 223KB,体积巨大 - 截至2017年10月一个页面内的 Javascript 平均体积是 452KB。但是,本地文件的体积占 170KB。如果你没有用到 多语言版 Moment.js,这些文件都会没有目的地使 bundle 更臃肿。
所有这些依赖都可以被轻易优化。我们在 Github repo 收集了优化的建议,check it out!
Enable module concatenation for ES modules (aka scope hoisting) 为 ES modles 开启模块连接
Note: 如果你在使用生产模式下的 webpack 4,modules concatention 已经开启,可以直接跳过本小节。
当你构建 bundle 时,webpack 将每一个 module 封装进 function 中:
1 | // index.js |
↓
1 | // bundle.js (part of) |
在以前,这么做是使 CommonJS/AMD modules 互相分离所必须的。但是,这会增加体积并且性能表现堪忧。
Webpack 2 介绍了 ES modules 的支持,不像 CommonJS 和 AMD modules 一样,而是能够不用将每一个 module 用 function 封装起来。同时 Webpack 3 利用ModuleConcatenationPlugin完成这样一个 bundle,下面是例子:
1 | // index.js |
↓
1 | // Unlike the previous snippet, this bundle has only one module |
看到区别了吗?在这个 bundle 中, module 0 需要 module 1 的 render 方法。使用 ModuleConcatenationPlugin,require被直接简单的替换成 require 函数,同时 module 1 被删除删除掉了。这个 bundle 拥有更少的 modules,就有更少的 modules 损耗!
在 Webpack 4 中开启这个功能,启用 optimization.concatenateModules 选项即可:
1 | // webpack.config.js (for webpack 4) |
在 webpack 3 中,使用 ModuleConcatenationPlugin 插件:
1 | // webpack.config.js (for webpack 3) |
Note:想要知道为什么这个功能不是默认启用?Concatenating modules 很棒, 但是他会增加编译的时间同时破坏 module 的热更新。这就是为什么只在生产环境中启用的原因了。
Further reading 扩展阅读
- Webpack docs for the ModuleConcatenationPlugin ModuleConcatenationPlugin 文档
- “Brief introduction to scope hoisting”
- Detailed description of what this plugin does 详述这些插件做了些什么
Use externals if you have both webpack and non-webpack code 如果代码中包含 webpack 和非 webpack 的代码要使用 externals
你可能拥有一个体积庞大的工程,其中一部分代码可以使用 webpack 编译,而有一些代码又不能。比如一个视频网站,播放器的 widget 可能通过 webpack 编译,但是其周围页面区域可能不是:

如果两部分代码有相同的依赖,你可以共享这些依赖以便减少重复下载耗时。the webpack’s externals option就干了这件事 - 它用变量或者外部引用来替代 modules。
如果依赖是挂载到 window 上的情况
如果你的非 webpack 代码依靠这些依赖,它们是挂载 window 上的变量,可以将依赖名称 alias 成变量名:
1 | // webpack.config.js |
利用这个配置,webpack 将不会打包 react 和 react-dom 包。取而代之,他们会被替换成下面这个样子:
1 | // bundle.js (part of) |
如果依赖是当做 AMD 包被加载的情况
如果你的非 webpack 代码没有将依赖暴露挂载到 window 上,这就更复杂了。但是如果非 webpack 代码使用 AMD 包的形式消费了这些依赖,你仍然可以避免重复的代码加载两次。
具体如何做呢?将 webpack 代码编译成一个 AMD module 同时别名成一个库的 URLs:
1 | // webpack.config.js |
Webpack 将会把 bundle 包装进 define()同时让它依赖于这些URLs:
1 | // bundle.js (beginning) |
如果非 webpack 代码使用相同的 URLs 加载依赖,这些文件将会加载一次 - 多余的请求会使用缓存。
Note:webpack 只是替换那些
externals对象中的准确匹配的 keys 的引用。这意味着如果你的代码这样写import React from 'react/umd/react.production.min.js',这个库是不会被 bundle 排除掉的。这是因为 - webpack 并不知道import 'react'和import 'react/umd/react.production.min.js'是同一个库,这样比较谨慎。
Further reading 扩展阅读
- Webpack docs on
externalsexternals 文档
Summing up 总结
- Enable the production mode if you use webpack 4 如果使用 webpack 4 开启生产模式
- Minimize your code with the bundle-level minifier and loader options 使用 bundle 级别最小化 和 loader 选项来最小化你的代码
- Remove the development-only code by replacing
NODE_ENVwithproduction通过将NODE_ENV替换成production来移除开发期间代码 - Use ES modules to enable tree shaking 启用 tree shaking
- Compress images 压缩图片
- Apply dependency-specific optimizations 开启依赖优化
- Enable module concatenation 开启 module 连接
- Use
externalsif this makes sense for you 如果有效果的话可以使用externals
Make use of long-term caching 利用好长时缓存
作者 Ivan Akulov
在做完优化应用体积之后的下一步提升应用加载时间的就是缓存。在客户端中使用缓存作为应用的一部分,这样会在每一次请求中减少重新下载的次数。
Use bundle versioning and cache headers 使用 bundle 版本和缓存头信息
做缓存通用的解决办法:
1.告诉浏览器缓存一个文件很长时间(比如一年)
1 | # Server header |
Note:如果你不熟悉 Cache-Control 做了什么,你可以看一下 Jake Archibald 的精彩博文 on caching best practices
2.当文件改变需要强制重新下载时去重命名这些文件
1 | <!-- Before the change --> |
这些方法可以告诉浏览器下载这些 JS 文件,将其缓存起来。浏览器将只会在文件名发生改变时才会请求网络(或者缓存失效的情况也会请求)。
使用 webpack,也可以做同样的事,但可以使用版本号来解决,需要明确这个文件的 hash 值。使用 [chunkhash] 可以将 hash 值包含进文件名中:
1 | // webpack.config.js |
Note: webpack 可能会生成不同的 hash 即使 bundle 相同 - 比如你重名了了一个文件或者重新在不同的操作系统下编译了一个 bundle。 This is a bug.
如果你需要将文件名发送给客户端,也可以使用HtmlWebpackPlugin或者WebpackManifestPlugin。
HtmlWebpackPlugin 使用起来很简单,但灵活性有一些欠缺。编译时,插件会生成一个 HTML 文件,这其中包括所有的编译后的资源文件。如果你的业务逻辑不复杂,这就非常适合你:
1 | <!-- index.html --> |
WebpackManifestPlugin 更灵活一些,它可以帮助你解决业务负责的部分。编译时它会生成一个 JSON 文件,这文件保存这没有 hash 值文件与有 hash 文件之间的映射。服务端利用这个 JSON 可以识别出那个文件有效:
1 | // manifest.json |
Further reading 扩展阅读
- Jake Archibald about caching best practices cache 的最佳实践
Extract dependencies and runtime into a separate file 将依赖和运行环境代码提取到一个单独的文件
Dependencies 依赖
App 依赖通常情况下趋向于比实际 app 内代码中更少的变化。如果你将他们移到独立的文件中,浏览器将可以把他们独立缓存起来 - 同时不会每次 app 代码改变时重新下载。
Key Term: 在 webpack 的技术中,利用 app 代码拆分文件被称为
chunks。我们后面会用到这个名词。
为了将依赖包提取到单独的 chunk 中,下面分为三步:
1.使用 [name].[chunkname].js 替换output的文件名:
1 | // webpack.config.js |
当 webpack 构建应用时,它会用一个带有 chunk 的名称来替换 [name]。如果没有添加 [name] 部分,我们不得不通过 chunks 之间的 hash 区别来比较他们的区别 - 那就太困难了!
2.将 entry 转成一个对象:
1 | // webpack.config.js |
在这段代码中,”main” 对象是一个 chunk 的名字。这个名字将会被步骤 1 里面的 [name]代替。
目前为止,如果你构建一个 app,chunk 就会包括整个 app 的代码 - 就像我们没有做这些步骤一样。但是很快就会产生变化。
3.在 Webpack 4 中,在配置中增加 optimization.splitChunks.chunks: 'all' 即可:
1 | // webpack.config.js (for webpack 4) |
这个选项会开启智能代码拆分。使用这个功能,webpack 将最小化和 Gzip 前大于 30KB 的代码提取出额外的 vendor 代码。它同时也会提取出 common 代码 - 这些代码在打包多个 bundles 会起到作用。(例如:通过路由拆分应用)。
在 Webpack 3 中,使用 CommonsChunkPlugin 插件:
1 | // webpack.config.js (for webpack 3) |
插件将包括全部 node_modules 路径下的 modules 同时将他们移到一个单独的文件中,这个文件被称为 vendor.[chunkhash].js。
完成了上面的步骤,每一次 build 都会生成两个文件。浏览器会将他们单独缓存 - 以便代码发生改变时重新下载。
1 | $ webpack |
Webpack runtime code 运行时代码
不幸的是,仅仅抽取 vendor 是不够的。如果你试图在应用代码中修改一些东西:
1 | // index.js |
你会注意到 vendor 的也会改变:
1 | Asset Size Chunks Chunk Names |
↓
1 | Asset Size Chunks Chunk Names |
这因为 webpack 打包时,一部分 modules 的代码,拥有 a runtime - 管理模块执行一部分代码。当你将代码拆分成多个文件时,这小部分代码在 chunk ids 和 匹配的文件之间开始了一个映射:
1 | // vendor.e6ea4504d61a1cc1c60b.js |
Webpack 将最新生成的 chunk 包含在这个 runtime 内,这个 chunk 就是我们代码中的 vendor。与此同时每一次任何 chunk 的修改,即使这一小部分代码也改变,也会导致整个 vendor chunk 改变。
为了解决这个问题,我们将 runtime 转义到一个独立的文件中,在 Webpack 4 中,开启 optimization.runtimeChunk 选项:
1 | // webpack.config.js (for webpack 4) |
在 Webpack 3中,通过 CommonsChunkPlugin 创建一个额外的空的 chunk:
1 | // webpack.config.js (for webpack 3) |
完成这一部分改变,每一次 build 都将生成三个文件:
1 | $ webpack |
将他们反过来顺序添加到 index.html 中,你就搞定了:
1 | <!-- index.html --> |
Further reading 扩展阅读
- Webpack guide on long term caching webpack 关于 cache 指南
- Webpack docs about webpack runtime and manifest webpack 关于 runtime and manifest 文档
- “Getting the most out of the CommonsChunkPlugin” 使用 CommonsChunkPlugin 的最佳实践
Inline webpack runtime to save an extra HTTP request 内联 webpack runtime 节省额外的 HTTP 请求
为了做的更好,我们可以尽力把 webpack runtime 内联在 HTML 请求里。下面举例:
1 | <!-- index.html --> |
这样做:
1 | <!-- index.html --> |
这个 runtime 很小,内联它可以帮助你节省 HTTP 请求(尤其对 HTTP/1 重要;但是在 HTTP/2 就没有那么重要了,但是仍能够提高效率)。
下面就来看看如何做。
如果使用 HtmlWebpackPlugin 来生成 HTML
如果使用 HtmlWebpackPlugin 来生成 HTML 文件,InlineChunkWebpackPlugin 就足够了。
如果使用自己的定制服务逻辑来生成 HTML
Webpack 4
1.增加 WebpackManifestPlugin 插件已知运行时 chunk:
1 | // webpack.config.js (for webpack 4) |
插件就会生成一个下面这样的文件:
1 | // manifest.json |
2.将这些内容嵌入到 runtime chunk 中。例如:使用 Node.js 和 Express:
1 | // server.js |
Webpack 3
1.将 runtime 名称改成静态的明确的文件名:
1 | // webpack.config.js (for webpack 3) |
2.嵌入到 runtime.js 内容。比如:Node.js 和 Express
1 | // server.js |
Lazy-load code that you don’t need right now 懒加载
通常情况下,一个页面有或多或少的重要部分:
- 如果你在 YouTube 上加载一个视频页面,相比评论区域你更在乎视频区域。这就是视频要比评论区域重要。
- 如果你在一个新闻网站打开一个报道,相比广告区域你更关心文章的内容。这就是文字比广告更重要。
在这些案例中,通过仅下载最重要的部分,懒加载剩余区域能够提升最初的加载性能。使用 the import() function 和 code-splitting 解决这个问题:
1 | // videoPlayer.js |
import()明确表示你期望动态地加载独立的 module。当 webpack 看到 import('./module.js')时,他就会将这个 module 移到独立的 chunk 中:
1 | $ webpack |
并且只在代码执行到 import() 才会下载。
这将会让 main bundle 更小,提升初始加载的时间。更重要的是改进缓存 - 如果你修改 main chunk 的代码,其他部分的 chunk 也不会受影响。
Note: 如果使用 Babel 编译代码,你会因为 Babel 还不认识 import() 而遇到语法错误抛出来。可以使用
syntax-dynamic-import解决这个错误。
Further reading 扩展阅读
- Webpack docs for the
import()function webpack 中 import() 文档 - The JavaScript proposal for implementing the
import()syntax
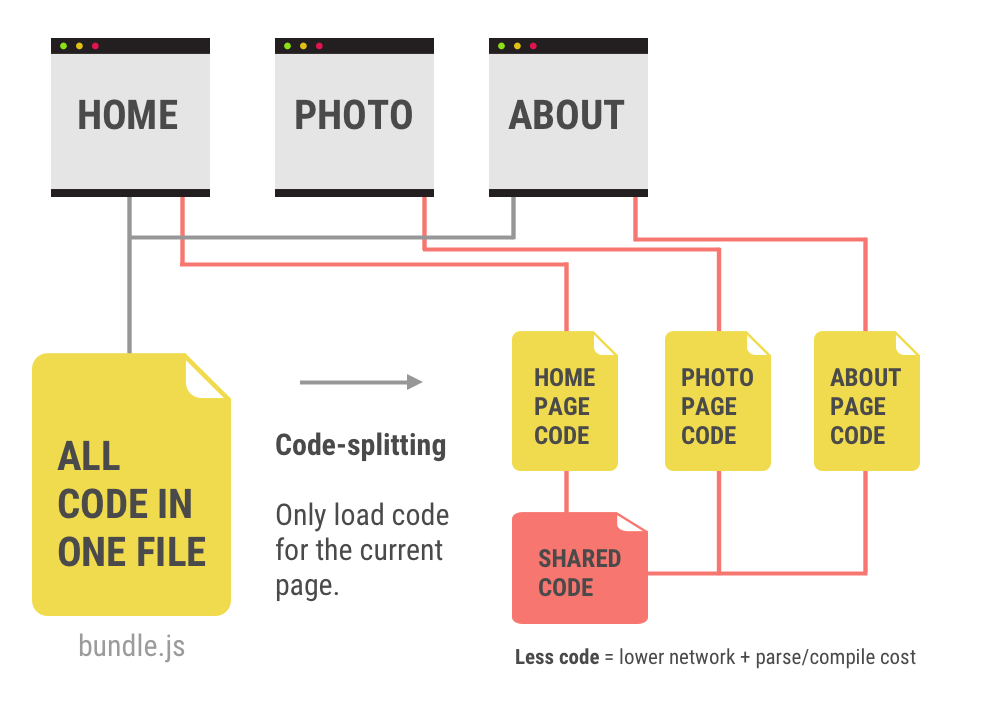
Split the code into routes and pages 拆分代码到路由和页面中
如果你的应用拥有多个路由或者页面,但是代码中只有单独一个 JS 文件(一个单独的 main chunk),这看起来你正在每一个请求中节省额外的 bytes 带宽。举个例子,当用户正在访问你网站的首页:
他们并不需要加载另外不同的页面上渲染文章标题的的代码 - 但是他们还是会加载到这段代码。更严重的是如果用户经常只访问首页,同时你还经常改变渲染文章标题的代码,webpack 将会对整个 bundle 失效 - 用户每次都会重复下载全部 app 的代码。
如果我们将代码拆分到页面里(或者单页面应用的路由里),用户就会只下载对他有意义的代码。更好的是,浏览器也会更好地缓存代码:当你改变首页的代码时,webpack 只会让相匹配的 chunk 失效。
For single-page apps 对于单页面应用
通过路由拆分带页面引用,使用 import()(看看 “Lazy-load code that you don’t need right now”这部分)。如果你在使用一个框架,现在已经有成熟的方案:
- “Code Splitting” in
react-router‘s docs (for React) - “Lazy Loading Routes” in
vue-router‘s docs (for Vue.js)
For traditional multi-page apps 对于传统的多页面应用
通过页面拆分传统多页面应用,可以使用 webpack 的 entry points 。如果你的应用有三种页面:主页、文章页、用户账户页,那就分厂三个 entries:
1 | // webpack.config.js |
对于每一个 entry 文件,webpack 将构建出独立的依赖树,并且声称一个 bundle,它将通过 entry 来只包括用到的 modules:
1 | $ webpack |
因此,如果仅仅是文章页使用 Lodash ,home 和 profile 的 bundle 将不会包含 lodash - 同时用户也不会在访问首页的时候下载到这个库。
拆分依赖树也有缺点。如果两个 entry points 都用到了 loadash ,同时你没有在 vendor 移除掉依赖,两个 entry points 将包括两个重复的 lodash 。在 Webpack 4 中我们可以设置 optimization.splitChunks.chunks: 'all' 解决该问题:
1 | // webpack.config.js (for webpack 4) |
这个选项可以开启智能拆分代码,webpack 将自动寻找 common code 并将其提取到一个单独的文件中。
在 Webpack 3 可以使用CommonsChunkPlugin来解决这个问题 - 它会将通用的依赖转移到一个独立的文件中:
1 | // webpack.config.js (for webpack 3) |
随意使用minChunks的值来找到最优的选项。通常情况下,你想要它尽可能体积小,但它会增加 chunks 的数量。举个例子,3 个 chunk,minChunks 可能是 2 个,但是 30 个 chunk,它可能是 8 个 - 因为如果你把它设置成 2 ,过多的 modules 将会打包进一个通用文件中,文件更臃肿。
Further reading 扩展阅读
- Webpack docs about the concept of entry points webpack 关于入口概念的文档
- Webpack docs about the CommonsChunkPlugin webpack 关于 CommonChunkPlugin 插件的文档
- “Getting the most out of the CommonsChunkPlugin”
Make module ids more stable 使用稳定的 module ids
当编译代码时,webpack 会分配给每一个 module 一个 ID。之后,这些 ID 就会被 require() 引用到 bundle 内部。你可以在编译输出的右侧在 moudle 路径之前看到这些 ID:
1 | $ webpack |
↓
1 | [0] ./index.js 29 kB {1} [built] |
默认情况下,这些 ID 是使用计数器计算出来的(比如第一个 module 是 ID 0,第二个 moudle 就是 ID 1,以此类推)。这样的问题就在于当你新增一个 module 事,它会出现在原来 module 列表中的中间,改变后面所有 module 的 ID:
1 | $ webpack |
↓ 我们增加一个新 module
1 | [4] ./webPlayer.js 24 kB {1} [built] |
↓ 现在看这里做了什么! comments.js 现在的 ID 由 4 变成了 5
1 | [5] ./comments.js 58 kB {0} [built] |
↓ ads.js 的 ID 由 5 变成 6
1 | [6] ./ads.js 74 kB {1} [built] |
这将使包含或依赖于具有更改ID的模块的所有块无效 - 即使它们的实际代码没有更改。在我们的代码中,_0_ 这个 chunk 和 main chunk 都会失效 - 只有 main 才应该失效。
使用HashedModuleIdsPlugin插件改变module ID 如何计算来解决这个问题。它利用 module 路径的 hash 来替换掉计数器:
1 | $ webpack |
↓
1 | [3IRH] ./index.js 29 kB {1} [built] |
有了这个方法,只有你重命名或者删除这个 moudle 它的 ID 才会变化。新的 modules 不会因为 module ID 互相影响。
启用这个插件,在配置中增加 plugins:
1 | // webpack.config.js |
Further reading 扩展阅读
- Webpack docs about the HashedModuleIdsPlugin HashModuleIdsPlugin 插件文档
Summing up
- Cache the bundle and differentiate between versions by changing the bundle name 缓存 bundle 包并通过修改 bundle 名称来做版本差异
- Split the bundle into app code, vendor code and runtime 将 bundle 拆分成 app 业务代码、vendor 代码、runtime 代码
- Inline the runtime to save an HTTP request 将 runtime 代码内联节省 HTTP 请求
- Lazy-load non-critical code with
import通过 import 懒加载非必要代码 - Split code by routes/pages to avoid loading unnecessary stuff 通过路由或页面拆分阻止加载不必要代码
Monitor and analyze the app 监控并分析
作者 Ivan Akulov
即使当你配置好你的 webpack 让你的应用尽可能体积较小的时候,跟踪这个应用就非常重要,同时了解里面包含了什么。除此之外,你安装一个依赖,它将让你的 app 增加两倍大小 - 但并没有注意到这个问题!
这一部分就来讲解一些能够帮助你理解你的 bundle 的工具。
Keep track of the bundle size 跟踪打包的体积
在开发时可以使用webpack-dashboard和命令行bundlesize 来监控 app 的体积。
webpack-dashboard
webpack-dashboard可以通过依赖体积大小、进程和其他细节来改进 webpack 的输出。
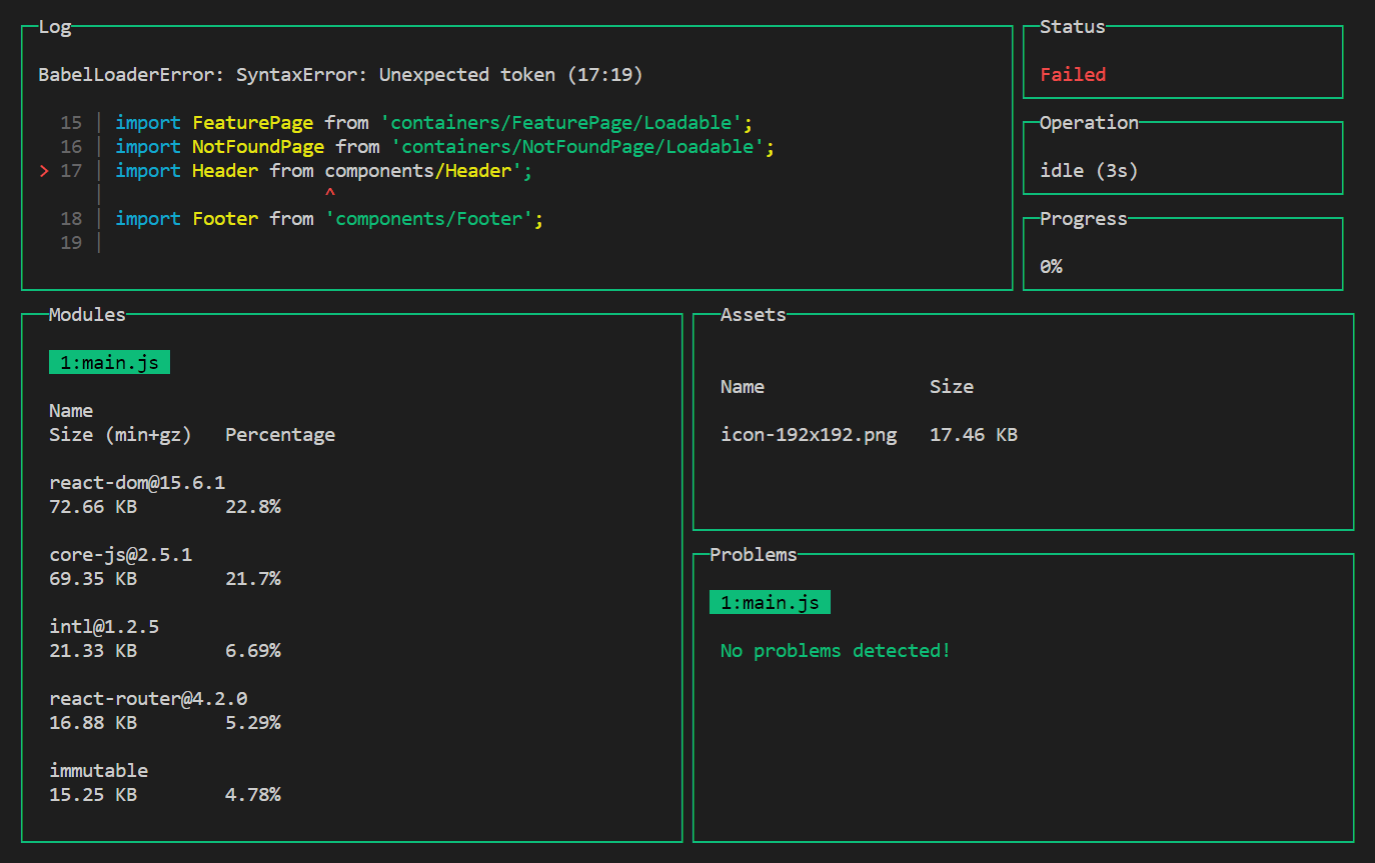
这个 dashborad 帮助我们跟踪大型依赖 - 如果你增加一个依赖,你就立刻能在 Modules section 始终看到它!
启用这个功能,需要安装 webpack-dashboard 包:
1 | npm install webpack-dashboard --save-dev |
同时在配置的 plugins 增加:
1 | // webpack.config.js |
或者如果正在使用基于 Express dev server 可以使用 compiler.apply():
1 | compiler.apply(new DashboardPlugin()); |
多尝试 dashboard 找出改进的地方!比如,在 modules section 滚动找到那个库体积过大,把它替换成小的可替代的库。
bundlesize
bundlesize 可以验证 webpack assets 不超过指定的大小。通过自动化 CI 就可以知晓 app 是否变的过于臃肿:
配置如下:
Find out the maximum sizes 找出最大体积
1.分析 app 尽可能减小体积,执行生产环境的 build。
2.在package.json中增加bundlesize部分:
1 | // package.json |
3.使用npx执行bundlesize:
1 | npx bundlesize |
它就会将每一个文件的 gzip 压缩后的体积打印出来:
1 | PASS ./dist/icon256.6168aaac8461862eab7a.png: 10.89KB PASS./dist/icon512.c3e073a4100bd0c28a86.png: 13.1KB PASS./dist/main.0c8b617dfc40c2827ae3.js: 16.28KB PASS./dist/vendor.ff9f7ea865884e6a84c8.js: 31.49KB |
4.每一个体积增加10-20%,你将得到最大体积。这个10-20%的幅度可以让你像往常一样开发应用程序,同时警告你,当它的大小增长太多。
Enable bundlesize 启用 bundlesize
5.安装bundlesize开发依赖
1 | npm install bundlesize --save-dev |
6.在package.json中的bundlesize部分,声明具体的最大值。对于某一些文件(比如图片),你可以单独根据文件类型来设置最大体积大小,而不需要根据每一个文件:
1 | // package.json |
7.增加一个 npm 脚本来执行检查:
1 | // package.json |
8.配置自动化 CI 来在每一次 push 时执行npm run check-size做检查。(如果你在 Github 上开发项目,直接可以使用integrate bundlesize with GitHub。)
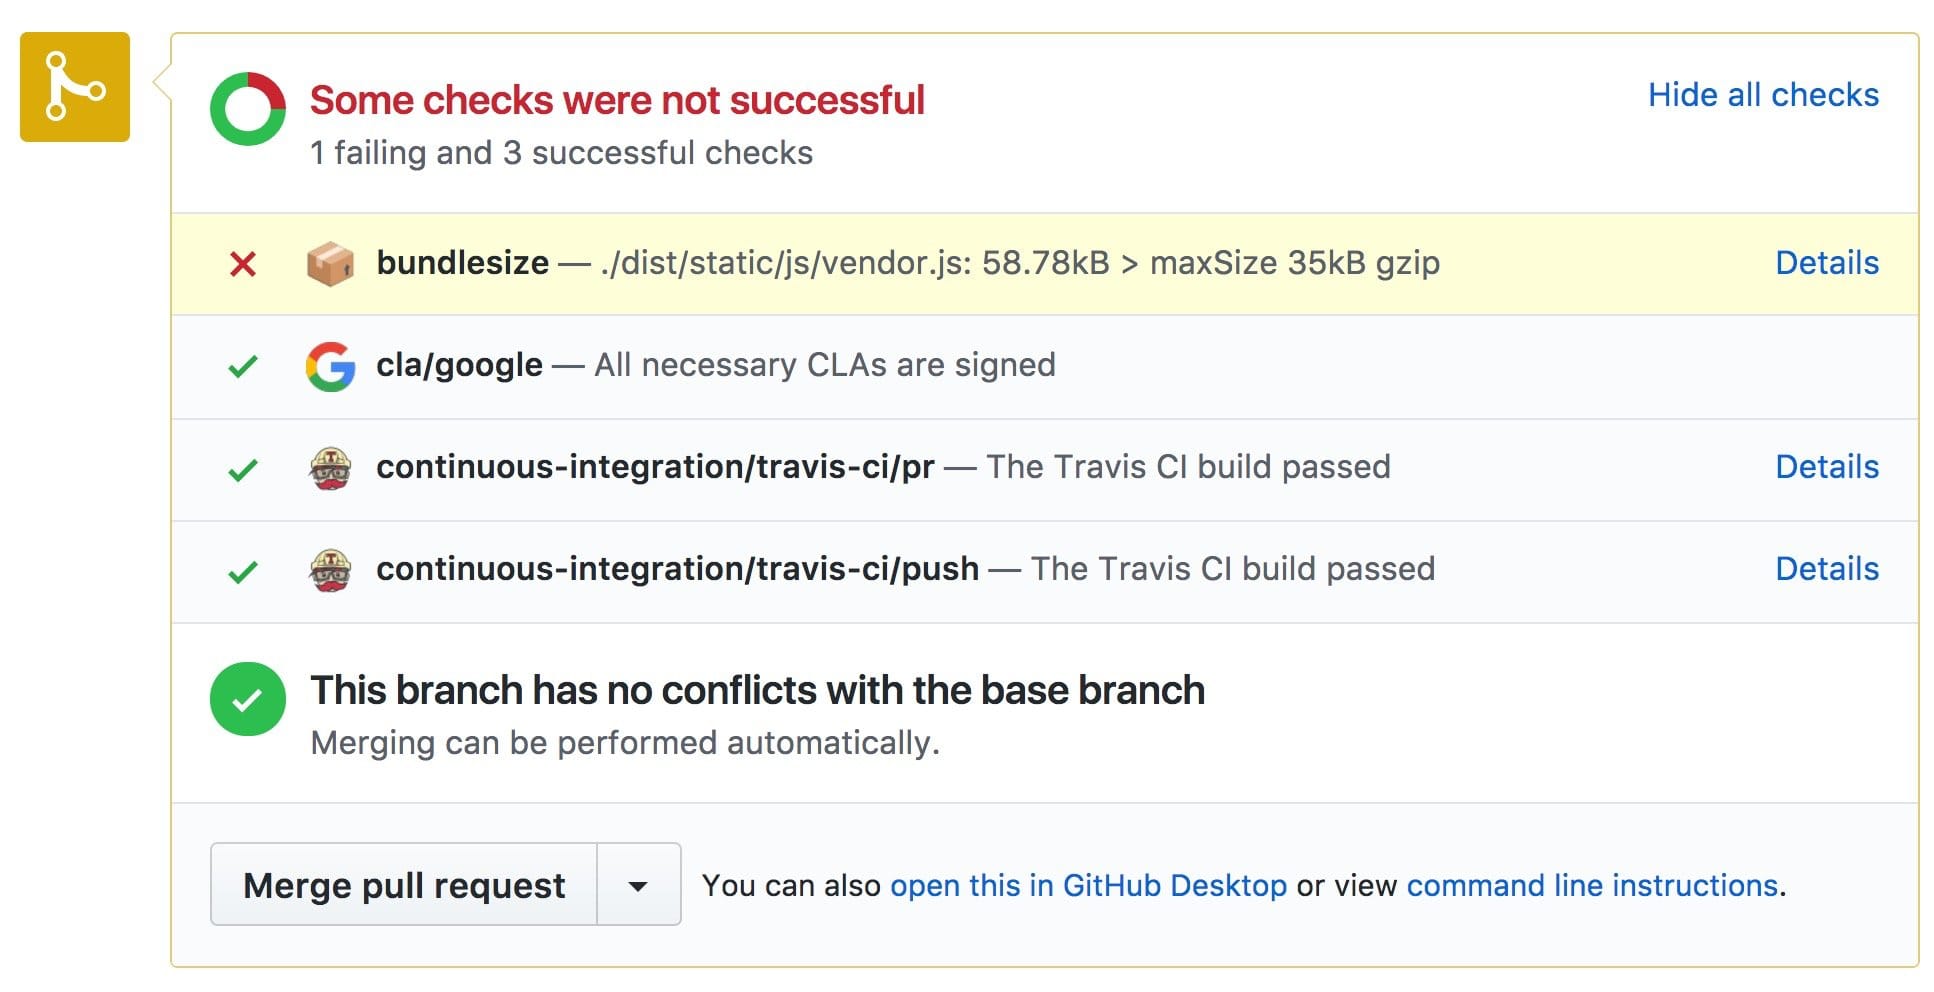
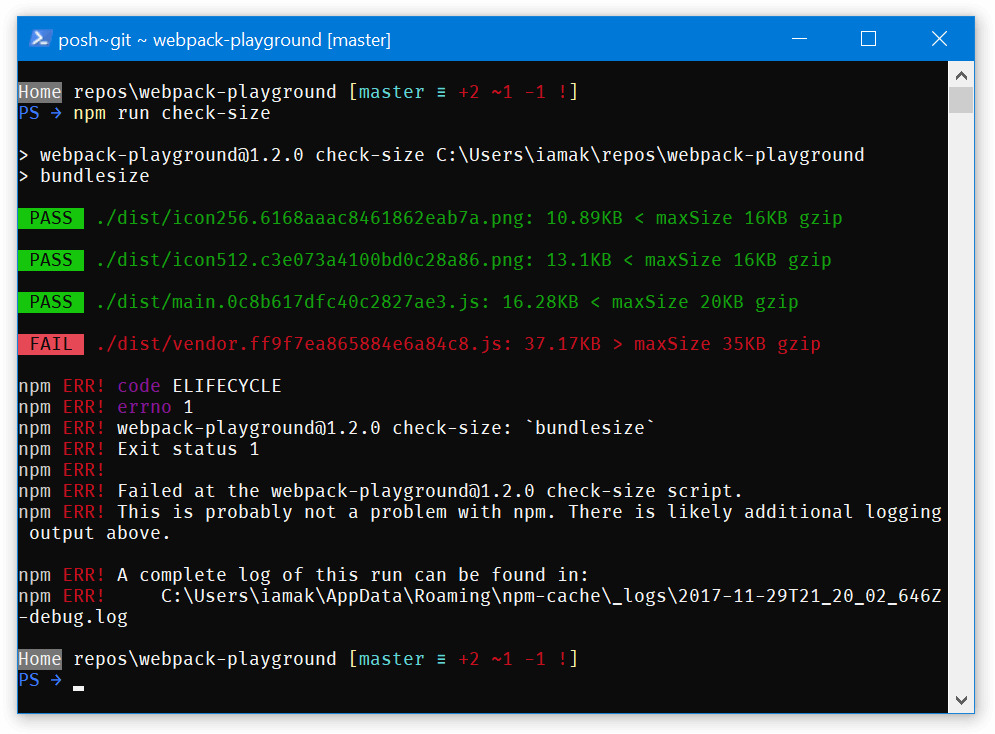
这就全部了!现在如果你运行npm run check-size或者 push 代码,你就会看到输出的文件是否足够小:

或者下面失败的情况
Further reading 扩展阅读
- Alex Russell about the real-world loading time we should target
Analyze why the bundle is so large 分析 bundle 为什么这么大
你想要深挖 bundle 内,看看里面具体哪些 module 占用多大空间。webpack-bundle-analyzer
译者注:此处有视频,需要科学上网,请自行观看
(Screen recording from github.com/webpack-contrib/webpack -bundle-analyzer)
webpack-bundle-analyzer 可以扫描 bundle 同时构建一个查看内部的可视化窗口。使用这个可视化工具找到过大或者不必要的依赖。
使用这个分析器,需要安装webpack-bundle-analyzer包:
1 | npm install webpack-bundle-analyzer --save-dev |
在 config 中增加插件:
1 | // webpack.config.js |
运行生产环境的 build 这个插件就会在浏览器中打开一个显示状态的页面。
默认情况下,这个页面会显示语法分析后的文件体积(在 bundle 出现的文件)。您可能想比较 gzip 的大小,因为这更接近实际用户的体验;使用左边的边栏来切换尺寸。
Note: 如果你使用 ModuleConcatenationPlugin,它可能在webpack-bundle-analyzer输出时合并一部分 module,使得报告小一些细节。如果你使用这个插件,在执行分析的时候需要禁用掉。
下面是报告中需要看什么:
- Large dependencies 大型依赖 为什么体积这么大?是否有更小的替代包(比如 Preact 替代 React)?用了全部代码(比如 Moment.js 包含大量的本地变量 that are often not used and could be dropped)?
- Duplicated dependencies 重复依赖 是否在不同文件中看到过相同的库?(在 Webpack 4 中配置
optimization.splitChunks.chunks,或者在 Webpack 3中 使用 CommonsChunkPlugin 将他们移到一个通用文件内)亦或是在同一个库中 bundle 拥有多个版本? - Similar dependencies 相似依赖 是否存在有相似功能的相似库存在?(比如moment和date-fns 或者 lodash 和 lodash-es)尽力汇总成一个。
同样的,也可以看看 Sean Larkin 的文章 great analysis of webpack bundles。
Summing up 小结
- Use
webpack-dashboardandbundlesizeto stay tuned of how large your app is - Dig into what builds up the size with
webpack-bundle-analyzer
Conclusion
总结:
- 剔除不必要的体积 把所有的代码都压缩最小化,剔除无用代码,增加依赖时保持谨慎小心。
- 通过路由拆分代码 只在真正需要的时候才加载,其余部分做懒加载。
- 缓存代码 应用程序某些部分代码更新频率低于其他部分代码,可以将这些部分拆分成文件,以便在必要时仅重新下载。
- 跟踪体积大小 使用 webpack-dashboard 和 webpack-bundle-analyzer 监控你的 app。每隔几个月重新检查一下你的应用的性能。
Webpack 不仅仅是一个帮助你更快创建 app 的工具。它还帮助使你的 app 成为 a Progressive Web App ,你的应用拥有更好的体验以及自动化的填充工具就像Lighthouse根据环境给出建议。
不要忘记阅读 webpack docs - 里面提供了大量的优化相关的信息。
多多练习 with the training app!